This is my second post in a series of posts where I share with you some of my favorite activities and methods to expose our little literacy learners to the letters of the alphabet. If you missed my first post about how I use alphabet charts, you can click here.
In addition to using alphabet charts, I also like to reinforce the
letters in the child's name.
Many of my kinderkids come to school without the ability to recognize their name, let alone know that their name is comprised of letters. If this is the case, I begin my instruction with name recognition. As they improve their ability to recognize their name in print, we move on to learning about the first letter of their name, and then the remaining letters. We talk about the names of the letters, what they look like, and the sounds they make.
Here are some activities that I have done to help expose children to the letters in their names (since I am not in school for two more weeks, my daughter had some fun practicing with her name to show you some of the activities):
~ Use or make tactile letters. I create tactile letters using glue! Write or print out the name first and then trace over it using the glue (regular Elmer's glue is fine). Then let it sit out overnight and the next day the child is able to feel the letters in their name. As the child traces over each letter, reinforce the name of the letter. (Adding sand or glitter may help with texture.)

~ If you have a group of students, you could identify the first letter in their names. Then use the alphabet chart to put the names in alphabetical order.
~ Talk about and count the number of letters in their name. If you have a group of children you can compare the length of the names and even graph them.
~ Write the first letter (or any of the letters) on an 8 X 10 piece of paper and have the child use a DO-A-DOT marker to trace over letter. Ask the child to say the letter name and/or letter sound each time they push down with the DO-A-DOT.

~ Go through magazines and cut out the letters in their name.
~ Match letter tiles, foam letters, or letters cut from an index card to a visual model of their name (or place the letters in the correct order).

~ Sing the letters in their name. Depending on the length of the name I have used the songs, "BINGO", "Happy Birthday", etc...
~ Find the letters in their name using Scrabble Cheez-Its. They then eat them (the funnest part of course)!
~ Complete a sort: letters in name vs. letters that are not.

~ Write the student's name with a highlighter and have the student practice tracing the letters with a pencil to write their name. If the student is more advanced than this, he/she can rainbow write their name.
~ Use Highway ABC Cards. Have the child pick out the letters in his/her name and use a car to drive over each letter.

~ Write letters of name on a paint stirrer (or even an index card) and again on individual clothespins. The child clips the clothespins to the correct letters to spell their name.
~ Use playdough or bendable wax sticks (like Wikki Stix) to form the letters.
~ Use different writing utensils and materials to practice writing name (paint in bags, chalk, water on chalkboard/concrete, shaving cream, play dough, colored sand, salt trays, etc...).

Here Paige is practicing forming her letters using some blue finger paint that I added to a Ziploc baggie. I made sure to remind her NOT to use her fingernail!
All of these activities can be differentiated depending on the child's exposure to the alphabet. For example, some children need to view a visual model of their name, other children are ready to do it without the visual model. Some of the children are ready to form the letters, other children need to continue to identify the letters. Each activity is geared to providing the child with multiple exposures to practice naming the letters. Throughout each activity I reinforce the name of the letter and sometimes the sound it produces.
For taking the time to read through this entire post, I wanted to share a FREEBIE with you! If you click on the picture below, you can download the Letters In Name sorting sheet for free through my Teachers Notebook shop. I also included some letter tiles to use with it.
In addition to using alphabet charts, I also like to reinforce the
letters in the child's name.
Many of my kinderkids come to school without the ability to recognize their name, let alone know that their name is comprised of letters. If this is the case, I begin my instruction with name recognition. As they improve their ability to recognize their name in print, we move on to learning about the first letter of their name, and then the remaining letters. We talk about the names of the letters, what they look like, and the sounds they make.
Here are some activities that I have done to help expose children to the letters in their names (since I am not in school for two more weeks, my daughter had some fun practicing with her name to show you some of the activities):
~ Use or make tactile letters. I create tactile letters using glue! Write or print out the name first and then trace over it using the glue (regular Elmer's glue is fine). Then let it sit out overnight and the next day the child is able to feel the letters in their name. As the child traces over each letter, reinforce the name of the letter. (Adding sand or glitter may help with texture.)

Here I printed out Paige's name using a font called, "ABCPrint". You can download it to most computers for free here. The top picture was just after I traced the letters with the glue. The bottom picture shows the glue dry on the following day.
~ If you have a group of students, you could identify the first letter in their names. Then use the alphabet chart to put the names in alphabetical order.
~ Talk about and count the number of letters in their name. If you have a group of children you can compare the length of the names and even graph them.
~ Write the first letter (or any of the letters) on an 8 X 10 piece of paper and have the child use a DO-A-DOT marker to trace over letter. Ask the child to say the letter name and/or letter sound each time they push down with the DO-A-DOT.

Here Paige is practicing her P, saying, "P, /p/" each time she pushes down and makes a dot.
~ Match letter tiles, foam letters, or letters cut from an index card to a visual model of their name (or place the letters in the correct order).

Because Paige is practicing using the proper case when writing her name, I gave her two sets of letters-an upper case set and a lower case set, using only the letters in her name. She then had to choose the correct letters and place them in the correct order. I also had her name the letters of her name in order and again randomly.
~ Find the letters in their name using Scrabble Cheez-Its. They then eat them (the funnest part of course)!
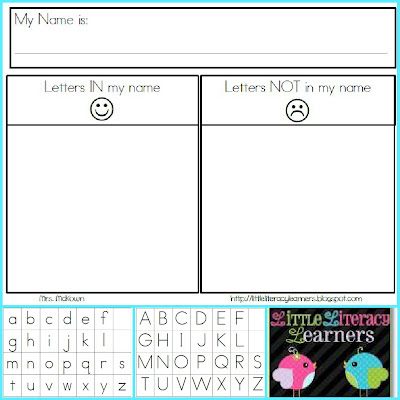
~ Complete a sort: letters in name vs. letters that are not.

Paige used some foam sticky letters that we had. If you keep scrolling down, you will find a FREEBIE for this activity! There is a place to write the child's name if he/she needs a visual model.
~ Write the student's name with a highlighter and have the student practice tracing the letters with a pencil to write their name. If the student is more advanced than this, he/she can rainbow write their name.
~ Use Highway ABC Cards. Have the child pick out the letters in his/her name and use a car to drive over each letter.

You can find the Highway ABC Cards here.
~ Write letters of name on a paint stirrer (or even an index card) and again on individual clothespins. The child clips the clothespins to the correct letters to spell their name.
~ Use playdough or bendable wax sticks (like Wikki Stix) to form the letters.
~ Use different writing utensils and materials to practice writing name (paint in bags, chalk, water on chalkboard/concrete, shaving cream, play dough, colored sand, salt trays, etc...).

Here Paige is practicing forming her letters using some blue finger paint that I added to a Ziploc baggie. I made sure to remind her NOT to use her fingernail!
All of these activities can be differentiated depending on the child's exposure to the alphabet. For example, some children need to view a visual model of their name, other children are ready to do it without the visual model. Some of the children are ready to form the letters, other children need to continue to identify the letters. Each activity is geared to providing the child with multiple exposures to practice naming the letters. Throughout each activity I reinforce the name of the letter and sometimes the sound it produces.
For taking the time to read through this entire post, I wanted to share a FREEBIE with you! If you click on the picture below, you can download the Letters In Name sorting sheet for free through my Teachers Notebook shop. I also included some letter tiles to use with it.

Thanks for bearing with me through this long post. I would love to hear how you use the names of the children to reinforce alphabetic skills!
Enjoy!